Saturday, January 26, 2008

Fixing Common Tomcat 5.5 Problems on Ubuntu 7.10

I've been playing with moving some of my webapps on to an Ubuntu 7.10 environment containing the official Ubuntu Tomcat 5.5 packages (tomcat5.5, tomcat5.5-admin, tomcat5.5-webapps). I had a couple of problems getting my webapps to run.

When I initially deployed the application, I received errors like the following in Tomcat's catalina-*.log (/var/lib/tomcat5.5/logs):

25-Jan-2008 8:29:09 PM org.apache.catalina.core.StandardContext start
SEVERE: Error listenerStart
25-Jan-2008 8:29:09 PM org.apache.catalina.core.StandardContext start
SEVERE: Context [/appname] startup failed due to previous errors


The application was outputting additional error messages to the console, which were being captured in /var/log/daemon.log on my system. This application uses Spring, and was logging huge stack traces including the following:

Jan 25 20:29:09 hostname jsvc.exec[32335]: ERROR - ContextLoader.initWebApplicationContext(206) | Context initialization failed org.springframework.beans.factory.BeanCreationException: Error creating bean with name 'dataSource' defined in ServletContext resource [/WEB-INF/applicationContext-hibernate.xml]: BeanPostProcessor before instantiation of bean failed; nested exception is org.springframework.beans.factory.BeanCreationException: Error creating bean with name 'org.springframework.transaction.config.internalTransactionAdvisor': Cannot create inner bean '(inner bean)' of type [org.springframework.transaction.interceptor.TransactionInterceptor] while setting bean property 'transactionInterceptor'; nested exception is org.springframework.beans.factory.BeanCreationException: Error creating bean with name '(inner bean)': Cannot resolve reference to bean 'transactionManager' while setting bean property 'transactionManager'; nested exception is org.springframework.beans.factory.BeanCreationException: Error creatin
...
at org.apache.catalina.security.SecurityUtil$1.run(SecurityUtil.java:244) ^Iat java.security.AccessController.doPrivileged(Native Method) ^Iat javax.security.auth.Subject.doAsPrivileged(Subject.java:517) ^Iat org.apache.catalina.security.SecurityUtil.execute(SecurityUtil.java:276) ^Iat org.apache.catalina.security.SecurityUtil.doAsPrivilege(SecurityUtil.java:162) ^Iat org.apache.catalina.core.ApplicationFilterChain.internalDoFilter(ApplicationFilterChain.java:262) ^Iat org.apache.catalina.core.ApplicationFilterChain.access$0(ApplicationFilterChain.java:192) ^Iat org.apache.catalina.core.ApplicationFilterChain$1.run(ApplicationFilterChain.java:171) ^Iat java.security.AccessController.doPrivileged(Native Method)


I was able to work around this problem by disabling Tomcat security in /etc/default/tomcat5.5:

TOMCAT5_SECURITY=no


After making this change and restarting Tomcat, my application again failed to start, but this time with a different error in catalina-*.log:

25-Jan-2008 8:51:55 PM org.apache.catalina.core.StandardContext start
SEVERE: Error filterStart
25-Jan-2008 8:51:55 PM org.apache.catalina.core.StandardContext start
SEVERE: Context [/appname] startup failed due to previous errors


The following was in /var/log/daemon.log:

Jan 25 20:51:55 hostname jsvc.exec[2025]: ERROR - StandardContext.filterStart(3639) | Exception starting filter struts javax.xml.transform.TransformerFactoryConfigurationError: Provider org.apache.xalan.processor.TransformerFactoryImpl not found ^Iat javax.xml.transform.TransformerFactory.newInstance(TransformerFactory.java:119) ^Iat com.opensymphony.xwork2.util.DomHelper$DOMBuilder.(DomHelper.java:167) ^Iat com.opensymphony.xwork2.util.DomHelper.parse(DomHelper.java:115) ^Iat com.opensymphony.xwork2.config.providers.XmlConfigurationProvider.loadConfigurationFiles(XmlConfigurationProvider.java:830) ^Iat com.opensymphony.xwork2.config.providers.XmlConfigurationProvider.loadDocuments(XmlConfigurationProvider.java:131) ^Iat com.opensymphony.xwork2.config.providers.XmlConfigurationProvider.init(XmlConfigurationProvider.java:100) ^Iat com.opensymphony.xwork2.config.impl.DefaultConfiguration.reload(DefaultConfiguration.java:130) ^Iat com.opensymphony.xwork2.config.ConfigurationManager.getConfiguration(Configurati
...


After consulting a Java forum thread, I removed the /usr/share/tomcat5.5/common/endorsed/xml-apis.jar symlink and restarted Tomcat. After making this change, my application started and functioned correctly.

Wednesday, January 23, 2008

Enabling JUnit Testing in Eclipse for Ubuntu

After installing Eclipse from the official Ubuntu packages for Ubuntu 7.10 (Gutsy Gibbon), the JUnit test integration does not work. When you attempt to run a JUnit Test, you will receive an error message like:

An internal error occurred during: 'Launching'

To resolve this error, you will need to update from the Eclipse repository outside of the Ubuntu package management tools. Follow these steps to install the Eclipse updates:

1. Open a terminal, and type:
sudo eclipse

Note that you need to use sudo; if you do not, you will not be able to install the updates. When prompted, keep the default workspace location and click "OK".

2. Choose "Help -> Software Updates -> Find and Install..." from the Eclipse menu bar.

3. Leave "Search for updates of the currently installed features" selected, and click on "Finish".

4. When prompted, choose the mirror that is closest to you, or scroll to the bottom of the list and choose "The Eclipse Project Updates". Click "OK" when you have chosen the mirror you wish to use.

5. Eclipse will download information about the available updates. When finished, it will display a dialog allowing you to select the features to install/update. Leave the defaults selected, and click on "Finish".

6. When prompted, accept the license agreement.

When installation is complete, exit out of eclipse, and launch it again from your Applications menu in Ubuntu. You should now be able to run JUnit tests using Eclipse's JUnit support.

Tuesday, January 22, 2008

Installing Apache Maven 2 on Ubuntu 7.10 Desktop

The Maven software project management tool is indispensable for managing the build process, reporting and documentation for Java development projects. Naturally, one of the first things I wanted to do on my new project was set up the build environment. Unfortunately, Maven is not available as a package for Ubuntu 7.10. It is available in the current unstable release (Hardy Heron).

To install Maven on Ubuntu 7.10, download the following packages from Hardy Heron:

maven2
libdoxia-java
libplexus-container-default-java
libclassworlds-java
libplexus-velocity-java
libjtidy-java
libplexus-interactivity-api-java
libplexus-component-api-java
libplexus-classworlds-java
libplexus-utils-java
libwagon-java


When all of the packages are downloaded, open a terminal and navigate to the directory that contains the packages. Execute the following command:

dpkg -i *.deb
Update: Per some comments, it may be necessary to execute the following command as well:

sudo apt-get install -f


dpkg will download the remaining dependencies and install all of the packages. When installation has completed, you can verify that Maven is installed and working by typing:

mvn --version


You should see something like:

Maven version: 2.0.8
Java version: 1.5.0_13
OS name: "linux" version: "2.6.22-14-generic" arch: "i386" Family: "unix"

Friday, January 18, 2008

Fix for Inability to Select Domain Users in Windows Select Users Dialog

This week, I set up a number of virtual servers using Windows 2003 and Windows XP. I noticed that I was not not able to select domain users or groups using the Windows Select Users dialog on any of the machines in the domain, except for the domain controller itself.

Symptoms

When attempting to specify a domain user or group in the Select Users dialog (for example, when modifying sharing or security settings on a folder), a Name Not Found dialog is displayed, with the following message:

The following object is not from a domain listed in the Select Location dialog box, and is therefore not valid:
Here are some screenshots showing an example of this problem:


When you click on the Locations... button, the only location displayed is the local machine.


Cause

The system's DNS settings do not include the DNS that stores information for the domain.

Solution

Modify the TCP/IP DNS settings for your network connection so that the DNS server for your windows domain is the primary DNS. For example, change this:


To this:


After making this change, you should be able to successfully use domain users and groups in the Select Users dialog. You may need to close out of the applications/utilities/windows that you were using to select users.

Thursday, January 17, 2008

Fixing Startup Failure of SQL Server Agent Service in SQL Server 2005

I recently set up a new SQL Server 2005 + service pack 2 installation in a Windows 2003 Server environment. The services were configured to start using the network service account (NT AUTHORITY\NetworkService). All of the services started successfully, except for SQL Server Agent.

Symptoms

A warning dialog will appear with the following error message:

The SQL Server Agent (MSSQLSERVER) service on Local Computer started and then stopped. Some services stop automatically if they have no work to do, for example, the Performance Logs and Alerts service.


In Event Viewer, an error event is logged with the following description:

SQLServerAgent could not be started (reason: Error creating a new session).


The following appears in the SQL Server Agent log file (located at C:\program files\Microsoft SQL Server\MSSQL.1\MSSQL\LOG\SQLAGENT.OUT on my system, but this will depend on the particulars of your installation):

2008-01-17 11:04:40 - ! [298] SQLServer Error: 15247, User does not have permission to perform this action. [SQLSTATE 42000] (DisableAgentXPs)
2008-01-17 11:04:40 - ! [298] SQLServer Error: 229, The EXECUTE permission was denied on the object 'sp_sqlagent_has_server_access', database 'msdb', schema 'dbo'. [SQLSTATE 42000] (ConnIsLoginSysAdmin)
2008-01-17 11:04:40 - ! [298] SQLServer Error: 229, The EXECUTE permission was denied on the object 'sp_sqlagent_get_startup_info', database 'msdb', schema 'dbo'. [SQLSTATE 42000]
2008-01-17 11:04:40 - ! [298] SQLServer Error: 229, The INSERT permission was denied on the object 'syssessions', database 'msdb', schema 'dbo'. [SQLSTATE 42000]
2008-01-17 11:04:40 - ! [000] Error creating a new session
2008-01-17 11:04:41 - ? [098] SQLServerAgent terminated (normally)
Cause

The account under which the SQL Server Agent runs does not have the permissions required to start the service successfully.

Solution

On my system, SQL Server Agent is configured to run as NT AUTHORITY\NetworkService. You will need to identify the user that runs SQL Server Agent on your system. To do this, open the Services administrative tool, right click on the SQL Server Agent (MSSQLSERVER) service, and choose properties. Click on the Log On tab, and note the user:


I gave this account the sysadmin server role in SQL Server. To do this, open SQL Server Management Studio and log in to the database engine. Drill down into Security, and then Logins. Right click on the user that runs SQL Server Agent, and choose properties. Under Select a page in the top left corner of the properties window, click on Server Roles. Enable the sysadmin role by clicking on the check box in the Server Roles pane, and then click on OK.


You should now be able to start SQL Server Agent successfully.

Friday, January 11, 2008

Installing Pentaho 1.6 and MySQL on Ubuntu 7.10

In my previous post, I documented how I created a virtual machine using Microsoft Virtual PC 2007, and installed Ubuntu 7.10 Desktop on it. I'm going to be using this virtual machine for some work with the Pentaho BI Suite. This post documents the steps I used to install the Pentaho suite of business intelligence software on my Ubuntu 7.10 system.

First, you will need to install MySQL and the Sun Java development kit. To do this, you will use the Synaptic Package Manager to download MySQL and Java, conveniently packaged for Ubuntu.

The Synaptic Package Manager is found in the System menu, as shown in this screenshot:


After launching, Synaptic will display a lengthy list of packages that are available for installation.


To find the MySQL package, click on the Search button in the toolbar at the top of the Synaptic window, and use the dialog to search for mysql.


Many packages related to mysql will be found. The package that you want to install is "mysql-server". This is a meta-package, meaning that it does not install anything, but instead depends on another package. Installing the meta-package will cause all of it's dependencies to be installed. As of this post, mysql-server depends on mysql-server-5.0, so version 5.0 of mysql will be installed.


To install mysql-server, left click and choose "Mark for installation" from the menu.


The entire dependency tree for mysql-server needs to be installed. Synaptic will display a dialog similar to the following to confirm that you want to install of the dependencies. Click on the "Mark" button in the bottom right to mark all of them for installation.


The checkboxes for all of the required packages will now be marked with an icon indicating that they will be installed.


Next, click on the Search button again, and search for "Java 5". Several packages will be found; the one you will need to install is "sun-java5-jdk". Follow the same steps that you did with "mysql-server" to mark the JDK for installation.

Click on the Apply button in the Synaptic toolbar. You will be prompted with a dialog summarizing the packages that are being installed; click on "Apply" to start the installation process.


Synaptic will then download and install the packages. Depending on your connection speed, this may take a few minutes.


Eventually, you will be presented with a dialog box that will allow you to set the password for the MySQL "root" user. Be careful in typing this password, as the configuration dialog does not prompt you to enter it twice.


You will also be prompted with a dialog box asking for confirmation of the Java license agreement. Review it, and if you accept, click on the checkbox and then "Forward".


When the installation is complete, you will be presented with a confirmation dialog. Close this window, and then exit Synaptic.


Next, you will install the Pentaho BI Suite. Download the Pentaho 1.6 for MySQL demo archive. Extract the contents of the archive to a directory on your system; I chose to extract it to a subdirectory of my home folder: ~/pentaho-demo.

To create and configure the MySQL databases that the Pentaho platform will use, open a terminal and navigate to the pentaho-demo directory. Execute the following command:

mysql -u root -p -e \
"source data/SampleDataDump_MySql.sql"


You will be prompted for the password of the MySQL root user; it is the password that you created when prompted by the Synaptic package manager. The script should run for a few seconds, and then drop back to the terminal prompt.

To start the demo, open a terminal (or use the same one that you used to create the databases) and navigate to the pentaho-demo directory. This directory contains a shell script that can be used to start the server. Execute this command in the terminal:

./start-pentaho.sh


The script will display a notification that the platform contains a version checker that will communicate with Pentaho's servers to determine if newer versions of the software are available. Read the notification, and press Enter if you wish to continue.

Depending on your system, it may take a few minutes for the server to start. When it has finished starting, you will see a message similar to the following:

14:32:11,508 INFO [STDOUT] Pentaho BI Platform server is ready. (Pentaho BI Platform 1.6.0.GA.863) Base Url = http://localhost:8080/pentaho/, Solution Path = /home/codespin/pentaho-demo/pentaho-solutions


To start playing with the demo, navigate to http://localhost:8080/pentaho/ in your browser. Choose one of the users in the dropdown, and then click "Login". To start learning more about the Pentaho BI platform, visit the Pentaho website and wiki.

Thursday, January 10, 2008

Installing Ubuntu 7.10 on Microsoft Virtual PC 2007

I've had to setup (and re-setup) a few virtual machines lately, so I thought I'd document the steps I use to get an Ubuntu 7.10 Desktop installation set up on Microsoft Virtual PC 2007. I'll be using this particular one for an installation of the Pentaho BI suite. I like to separate unrelated software installations into virtual machines that would resemble the setup that clients would have on their servers.

Before I describe the installation process, I'd like to thank Robert C. Cain and Martin Woodward, who both posted similar articles at their blogs. My article is similar because we were attempting the same thing, but the process I followed differs slightly from theirs. I encourage you to read theirs as well if you would like additional perspectives on how to set up your virtual machine.

First, you'll need to download Virtual PC 2007 from Microsoft. There is a version for x86 and a version for x64. Note that even if you download and install the x64 version, you will still only be able to run x86 operating systems in Virtual PC.

Once you have downloaded the appropriate version for your PC, you'll need to create a new virtual machine. Click the New... button in the Virtual PC Console, and walk through the wizard.


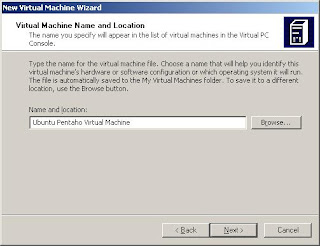
I chose the name "Ubuntu Pentaho Virtual Machine", as I plan to install Ubuntu, and then the Pentaho BI Suite.


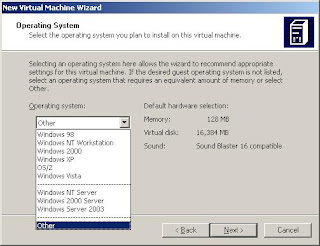
Select "Other" as the operating system. You will be able to adjust the memory and virtual disk size in the next screen in the wizard.


Adjust the RAM to the amount that you want the virtual machine to use. You will need to allocate at least 256MB in order to install Ubuntu Desktop.


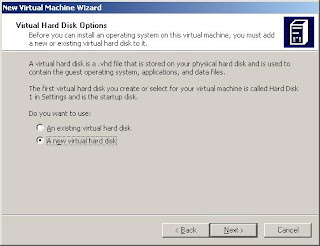
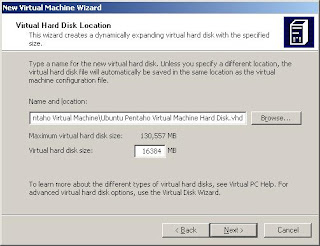
Unless you already have an existing virtual hard disk created by Virtual PC 2007, you will need to create a new virtual hard disk, so select the appropriate option on the next screen of the wizard.


I chose to use the default size of virtual hard disk, as it will be enough for what I plan to do with this installation. I also kept the default location of the virtual hard disk file, but you can override this to fit your needs.


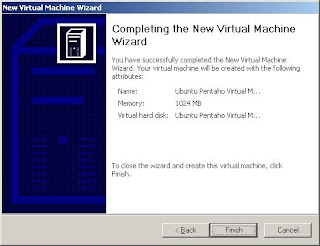
The final screen of the wizard allows you to verify the options you chose. Click Finish and the virtual machine will be created.


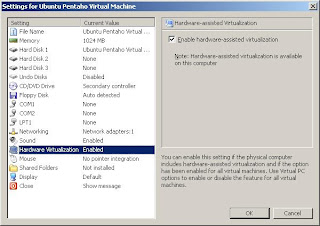
Your virtual machine is now created. Next, we'll alter one setting. Click on the Settings button.

Click on Hardware Virtualization in the list on the left side of the window. If hardware-assisted virtualization is available on your computer, you can enable hardware-assisted virtualization using the checkbox on the right side of the window. You can also alter any of the other settings to suit your needs; I didn't make any other changes to the default settings. Click on OK when you are finished your changes to the settings.


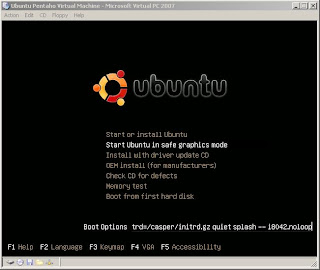
Click on the Start button on the Virtual PC Console. Before the boot process gets to far, use the CD menu to attach to either a physical CD/DVD drive or to an ISO disk image. I previously downloaded an ISO of Ubuntu 7.10, and chose the "Capture ISO Image..." option in the CD menu to attach to it. If the virtual machine was too far into the boot process to boot from the CD, you will need to reset the virtual machine using the command in the Action menu. Otherwise, you'll see a screen similar to this next:


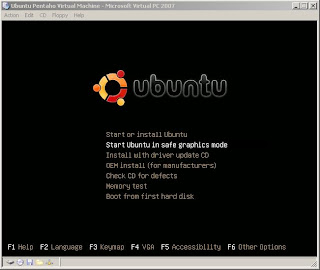
Scroll down to "Start Ubuntu in safe graphics mode", and press F6 to enter other options. By default, the boot options will not allow Ubuntu to see the virtual mouse provided by Virtual PC. On the next screen, you will need to add "i8042.noloop" to the end of the boot options. There should be one space between "--" and "i8042.noloop". When you've added this option, hit Enter to proceed.


The system will boot into a "Live CD" environment that will allow you to install Ubuntu Desktop from the same GUI that you will use after Ubuntu Desktop is installed. On my system, the virtual machine window was only displaying the top left corner of the Ubuntu desktop, as shown in this image:


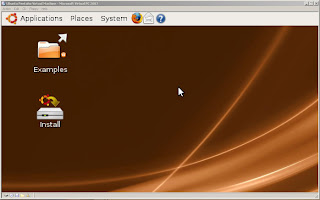
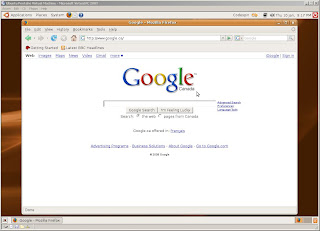
It's possible to cycle through the available resolutions using Ctrl-Alt-Numpad- and Ctrl-Alt-Numpad+. I used these to cycle through until the window displayed the entire desktop:


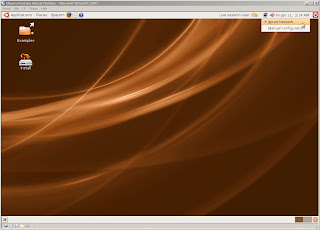
You'll notice that the network icon in the top right corner of the screen is indicating that there is no network connection. To ensure that the installer is able to access the Ubuntu apt sources, you can left-click on the icon and choose Wired Network, as shown in this image:


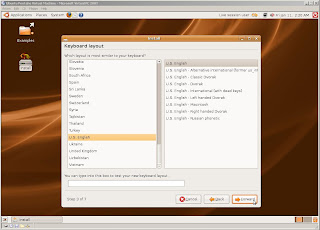
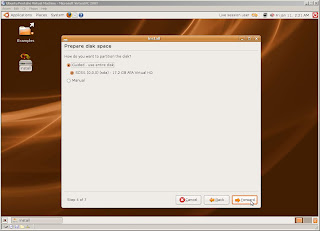
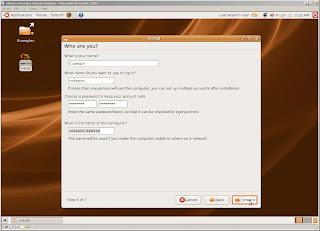
Double click on the Install icon, and an installation wizard will start. Walk through each step in the wizard; I selected the defaults in all of the screens shown. Note that unless you choose to manually partition the virtual hard disk, there will be no step 5 of 7 in the 7 step wizard.


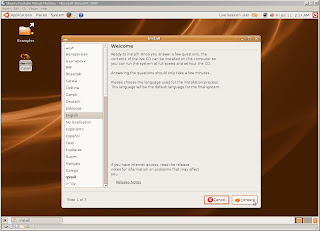
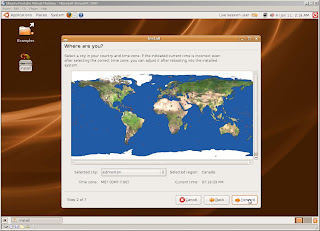
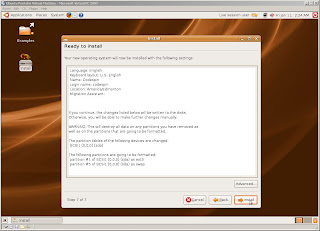
The last screen of the wizard confirms the choices you've made on the previous screens of the wizard. Click Install to begin the installation process.


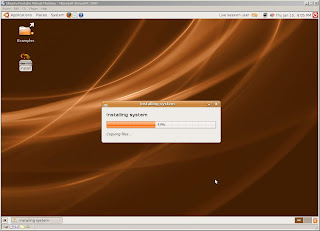
The installation process will take a few minutes, so feel free to take a break. If you did not enable networking as described earlier, you may receive an error message at some point in the installation process, otherwise the installation should proceed without errors.


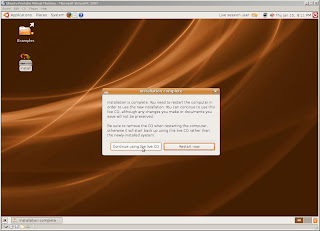
When the installation is complete, you will be prompted to restart or continue using the live CD. Choose the latter, so that you can release the CD from the virtual machine. After you've released the CD, click on the orange power icon in the top right corner of the screen and shut down.


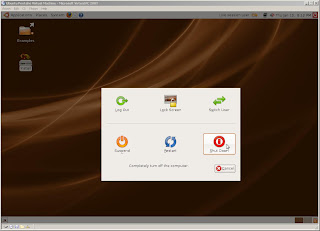
The shutdown process has occasionally frozen on my virtual machine, at a screen like this. If you encounter this, just choose Close from the Action menu and choose to turn off the virtual machine. If you are unable to move the mouse pointer to the action menu, press the right alt key on your keyboard to release the mouse from the virtual machine.


After the machine has shut down, start it up again. You will need to modify the Grub boot loader's settings so that Ubuntu will be able to use the mouse (similar to the modification that you made when booting from the CD). When you see the text "Grub Loading", press Escape to go to the Grub boot loader's menu. Note that you will only have a few seconds to hit escape before Grub will begin the boot process. If you hit Escape quickly enough, you will see a menu like the following.


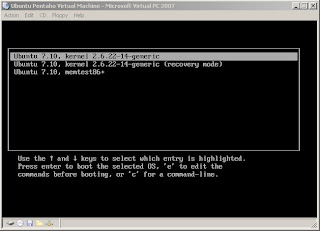
With the first item in the menu highlighted, hit e to edit the command.


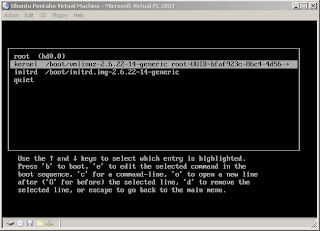
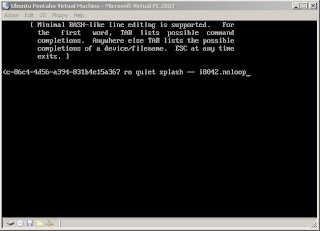
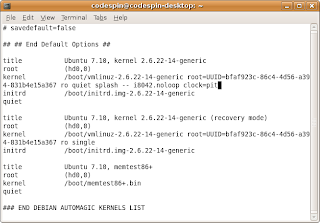
On the next menu, scroll down to the second item, and again hit e to edit. Modify the command to include the i8042.noloop option, as shown in the image below. When finished, press enter to accept the changes to the command, and then press b to boot.


After the system finished booting, you should see the Ubuntu login screen. Enter the username and password that you chose in the installation wizard.


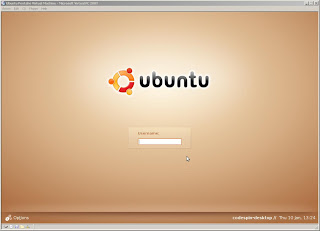
Congratulations, you now have a functional Ubuntu 7.10 Desktop installed in a virtual machine!


Note that there are still a few issues to correct:

  1. The system is not configured to use the i8042.noloop option each time it boots. To avoid having to enter this option each time we boot, we'll configure the Grub loader to use this option from now on.
  2. The system is not using modules for the virtual network card and virtual sound card provided by Virtual PC. We'll configure this below.
  3. The system is not connected to the network, as indicated by the network icon in the top right corner. As described in installation, you can left click on the network icon and select the network adapter each time you use the system, but it's better to configure it once and for all to avoid this manual step in the future. We'll configure it below.
  4. The system is not up-to-date, as indicated by the icon and tooltip in the top right corner of the screen. We'll update it below.
To correct the Grub configuration, you will need to edit the file /boot/grub/menu.lst. I opened a terminal (Applications->Accessories->Terminal):


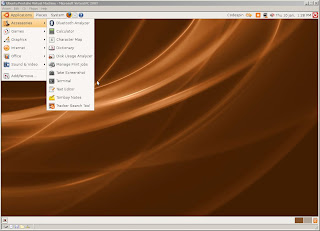
and then used the following command to edit the file:

sudo vi /boot/grub/menu.lst

You can substitute vi with another editor such as nano if you prefer.

Scroll to the end of the file, and edit the kernel options to include i8042.noloop and clock=pit as shown below. The clock=pit option is to prevent the virtual machine's clock from becoming out of synch with the PC's clock. More information about this problem is available in an article by Martin Woodward, and in a Microsoft Knowledge Base article.


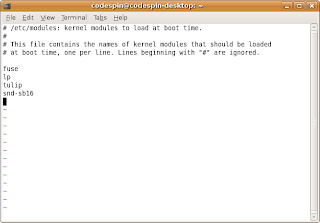
Next, edit the /etc/modules file to include the tulip and snd-sb16 modules, as shown below:


Next, we'll configure the network so that you will automatically be connected, rather than needing to select the network adapter using the network icon in the top right corner of the screen.

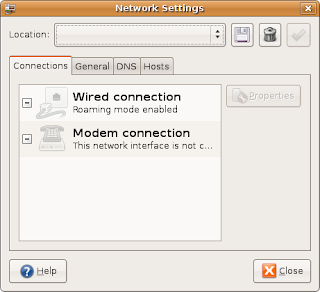
Left-click on the network icon, and choose "Manual Configuration...". A dialog box similar to the one below will be shown. Note that the Wired connection is in roaming mode; we will disable this and configure the network adapter to use DHCP.


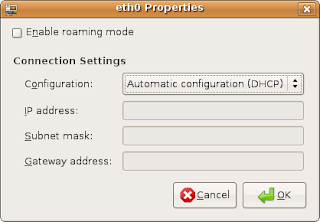
Click on the Wired connection, and then click on the Properties button. The following dialog box will be displayed. Uncheck the "Enable roaming mode" checkbox, and then choose "Automatic configuration (DHCP)" from the Configuration dropdown. Click on OK when the settings match those shown below.


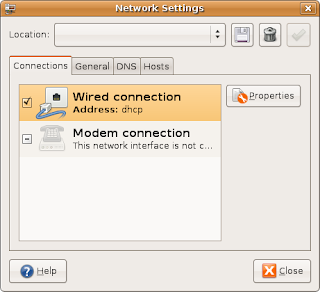
In the Network Settings dialog, you should see "Address: dhcp" under the Wired connection. Check the checkbox next to the Wired connection; this will activate the interface. On my virtual machine, I needed to reboot to get network connectivity.


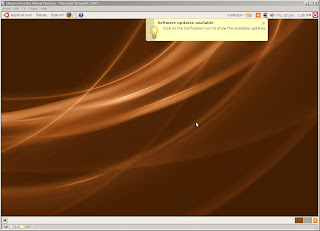
Now, we'll update the system to include the latest version of all installed packages from Ubuntu. Click on the orange notification icon in the top right corner of the screen to open the update manager.


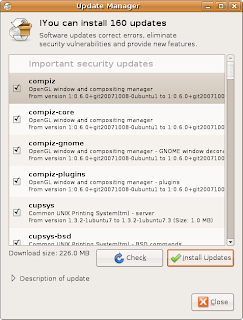
Click on the Install Updates button. When the updates have completed, you'll see the following:


IMPORTANT: After the updates have completed, you will likely need to edit the /boot/grub/menu.lst file again to ensure that the i8042.noloop and clock=pit options are specified. Do this before you reboot your system to ensure that your mouse will continue to work after installing the updates.

Your system may need to be rebooted in order for all of the updates to be active (for example, if the kernel was updated). The update manager will notify you of this.

Congratulations, you now have a functioning Ubuntu 7.10 Desktop virtual machine with sound and network connectivity, ready to use as you wish!


Note that I have not managed to get the mousewheel working in Virtual PC 2007. According to the comments on this article, it's not possible to enable the mousewheel. I found other advice on a thread related to Ubuntu 6.10 on the Ubuntu forums, but I was not able to get the mousewheel working using any of the suggestions posted. I tried using xev to watch the events that occur when using the mouse; I see events related to button presses and moving the mouse, but no events related to moving the mousewheel. If anyone has any advice on how to use the mousewheel with Ubuntu 7.10 on Virtual PC 2007, please post it!